


A tip to improve your dialogues in Adobe Audition is to use compression. What a compressor does is decreases the dynamic range of dialogue- that sounds horrible but is quite effective especially if you are mastering dialogue for theatrical release. A compressor will essentially brings the highest peak and the lowest peak in a waveform closer together so as to bring consistency in the overall amplitude of the dialogue. Often times while shooting, it is impossible to regulate the level of the audio. To overcome this we use compression so that the loudest part and the softest part are audible. Let’s see how to do this in Adobe Audition. This can be done in any sound editing application or digital audio workstation as the principles used are the same.
What is the amplitude?
On a waveform editor, how high or low the wave goes is the amplitude. The higher the amplitude, the higher the level of the audio.

In the above figure, we can see that the difference between the highest waveform and the lowest waveform is quite stark. We need to compress the audio in order to bring them close together so that the dialogue is audible properly. Now let’s see what a compressor looks like.
Take note that a compressor affects the highest peak and not the lowest peak. In any type of compression, we will affect only the higher amplitudes of the waveform.
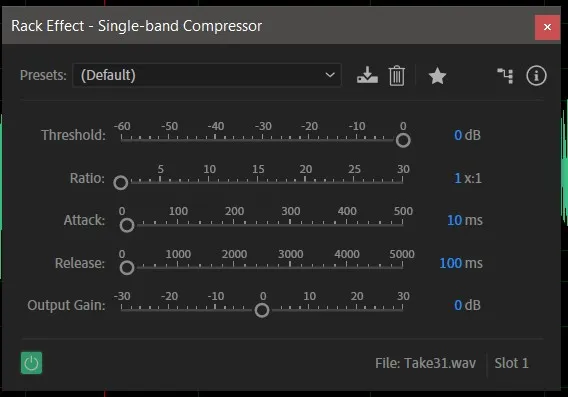
Now,
As you can see there are five parameters for us to modify. Below is what all this means:
Threshold: After what level will the compressor start to work. Let’s say on our waveform we need our compressor to start working at -9dB so we will set the threshold to -9dB. See the figure below
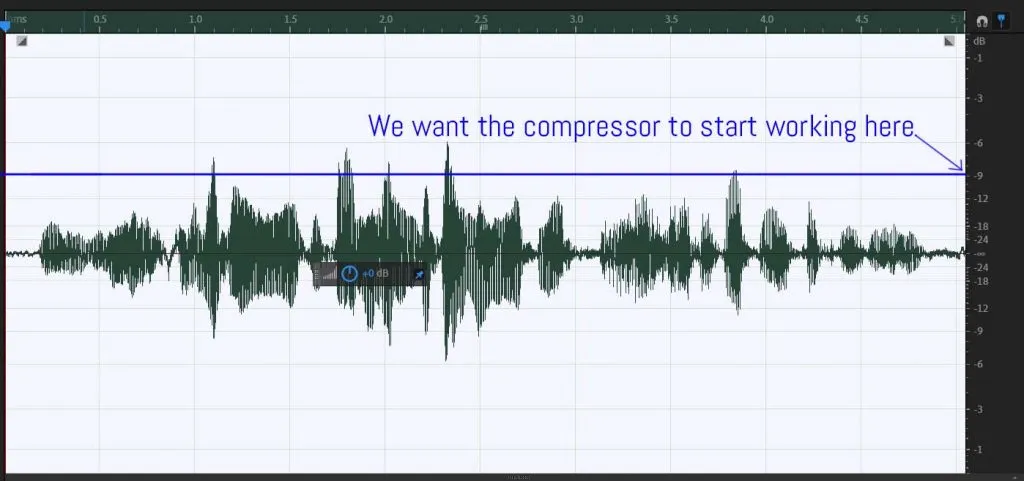
In this figure we can see the parts of the waveform that are clearly going above -9dB and we want to bring them down so we will set the threshold to -9dB so as soon as the compressor detects that the amplitude goes above -9dB, it will kick into action.
Ratio: How much do you want to affect the waveform. The ratio will decide the degree to which the amplitude above -9dB will be affected. So, the higher this number the more it will affect the waveform. Let’s say we put the ratio 30:1 (never go this high for dialogues) then the compressor will make the audio above the -9dB mark to be 1/30 of its original amplitude. So if the highest peak is -6dB then the -3dB between -9dB and -6dB will become 1/30 of it’s original which is 0.3db i.e. the amplitude above -9db will become -0.3dB. I hope that is understood.
For dialogues, this ratio is kept between 2-2.5 and max 3. Anything above that will make your compression for dialogues sound weird.
Attack: How quickly do you want the compressor to kick in. This parameter decides how quickly the compressor will start to affect the waveform in milliseconds. We generally want to keep this at around 10ms for dialogues. So in our example the compressor will compress the amplitude above -9dB after 10 milliseconds as soon as the amplitude crosses -9dB. Think of this as the fade in effect. So, as soon as the amplitude hits -9dB, the compressor will reach it’s full potential after 10 milliseconds.
Release: This is the fade out and it decides how long will it take the compressor to come back to zero before the amplitude crosses below -9dB. A good number for dialogues is 100 milliseconds to 150 milliseconds.
Output Gain: While compressing our track we will definitely lose some of the overall amplitude so to make up for the loss we increase the output gain. The amount lost can be observed from the level indicator
In the above GIF we can see the compressor working. Notice that the highest peaks are brought down without affecting the lower peaks at all.
This was the single band compressor. We can target bands of frequencies using the multiband compressor.

In the figure above we can see four frequency bands which are 0hz – 120hz, 120hz – 2000hz, 2000hz – 10000hz and 10000hz – ∞hz
For female voices the base frequency is generally around 150hz anything below that is noise and can be removed. For male voices the base frequency is generally 100 hz and anything below that can be removed. This is the first band. From the above figure we can see it’s colour to be blue. The frequency ranges can be set by change the values in the crossover.
For compressing dialogues the first frequency band is compressed heavily so we will set the ratio around 8 here. This frequency band contains frequencies that are larger i.e. bass frequencies. Most of the wind noise lives here.
The second frequency band is where most of the human voice lives so the compression will be done carefully here. From the figure above we can see it is set from 120hz to 2000hz We do not mess too much here and keep the ratio somewhere between 2 and 3 anything above that will make our dialogue sound unnatural.
2000hz-10000hz is where the high frequencies stay and this band gives colour to our dialogue. Our compression can be a little aggressive here but not too much. A ration of 4 to 6 is good.
The ‘sss’ sounds stay somewhere around 8khz so the upper limit of this frequency band can be set around 7800hz – 7900hz.
The last band contains the extreme highs and this band can be compressed however we want it to. Mostly noise lives here but it can be inspected to find some details and hence can be used. In most cases however we can compress this band heavily with a compression ratio of 8.
I hope this will encourage you to use compression for dialogues in your future projects.
